Un plugin WordPress est un type de logiciel tiers qui offre des fonctionnalités supplémentaires dans WordPress. Grâce à WP Toolkit, vous pouvez installer et gérer des plugins dans une ou plusieurs installations WordPress.
- 1. Installation de plugins
- 1.1 Comment installer des plugins sur une installation WordPress spécifique
- 1.2 Comment installer des plugins sur toutes les installations WordPress de l'abonnement
- 1.3 Comment installer des plugins qui ont été téléchargés par l'administrateur Plesk
- 1.4 Comment télécharger un plugin
- 2. Activer et désactiver des plugins
- 2.1 Comment activer ou désactiver des plugins pour toutes les installations d'un abonnement
- 3. Mise à jour des plugins
- 3.1 Comment mettre à jour des plugins sur toutes les installations de l'abonnement
- 4. Suppression de plugins
1. Installation de plugins
Grâce à WP Toolkit, vous pouvez installer des plugins dans une ou toutes les installations WordPress de l'abonnement. Fonctions :
- Vous pouvez rechercher des plugins et installer les plugins trouvés dans le dépôt des plugins wordpress.org.
- Installer des plugins qui ont été téléchargés par l'administrateur Plesk.
- Téléchargez des plugins personnalisés. Cela est utile si vous ne trouvez pas de plugin adéquat dans le dépôt wordpress.org ou si vous devez installer votre propre plugin.
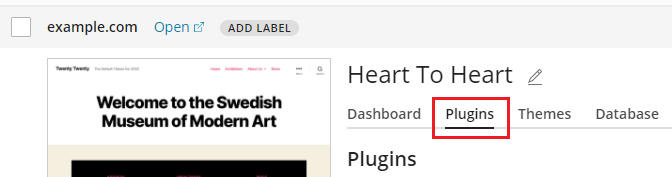
1.1 Comment installer des plugins sur une installation WordPress spécifique :
-
Allez dans « WordPress », ouvrez l'onglet « Plugins » sur une carte d'installation et cliquez sur « Installer ».
-
Recherchez des plugins et cliquez sur « Installer » à côté des plugins que vous souhaitez installer. Les plugins installés seront immédiatement activés.
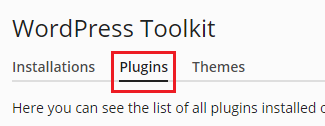
1.2 Comment installer des plugins sur toutes les installations WordPress de l'abonnement :
-
Sélectionnez l'abonnement souhaité.
-
Allez dans « WordPress » > Tab « Plugins » puis cliquez sur « Installer ».
-
Sélectionnez les plugins que vous souhaitez installer et cliquez ensuite sur « Sélectionner les sites ».
Remarque : Si vous sélectionnez un ou plusieurs plugins et effectuez ensuite une nouvelle recherche sans installer les plugins sélectionnés, la sélection sera réinitialisée.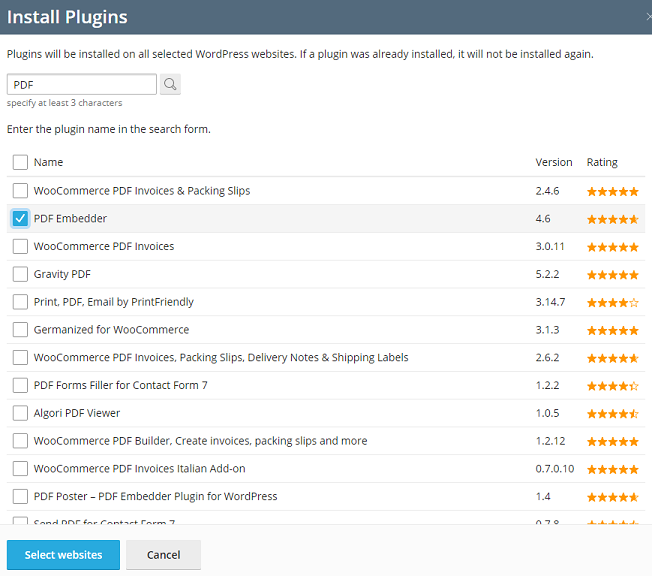
-
Par défaut, les nouveaux plugins installés sont immédiatement activés. Vous pouvez empêcher cela en décochant la case « Activer après l'installation ».
-
Sélectionnez les sites sur lesquels les plugins doivent être installés, puis cliquez sur « Installer ».
1.3 Comment installer des plugins qui ont été téléchargés par l'administrateur Plesk :
-
Allez dans « WordPress » > onglet « Plugins ».
-
Cliquez sur « Installer » à côté d'un plugin marqué avec le symbole «
 ». Si aucun de ces symboles n'apparaît, cela signifie que l'administrateur Plesk n'a pas téléchargé de plugins.
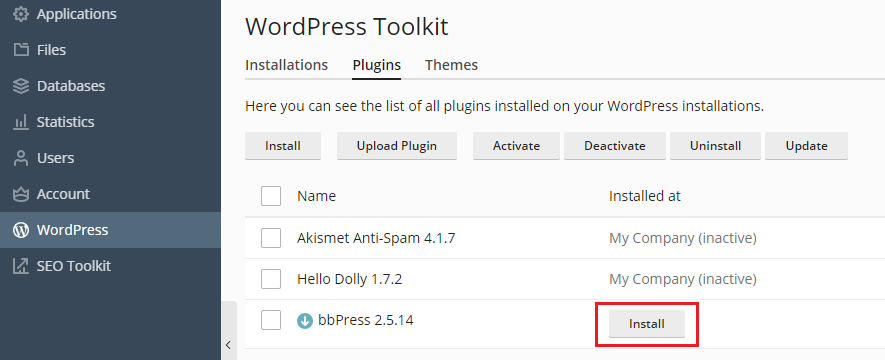
-
Sélectionnez les installations WordPress sur lesquelles vous souhaitez installer le plugin.
-
Par défaut, les plugins téléchargés par l'administrateur Plesk sont immédiatement activés. Vous pouvez empêcher cela en décochant la case « Activer après l'installation ».
-
Cliquez sur « Installer ».
1.4 Comment télécharger un plugin :
-
Sélectionnez l'abonnement souhaité.
-
Allez dans « WordPress » > onglet « Plugins » puis cliquez sur « Télécharger un plugin ».
-
Cliquez sur « Parcourir… » et accédez à l'emplacement du fichier ZIP du plugin que vous souhaitez télécharger.
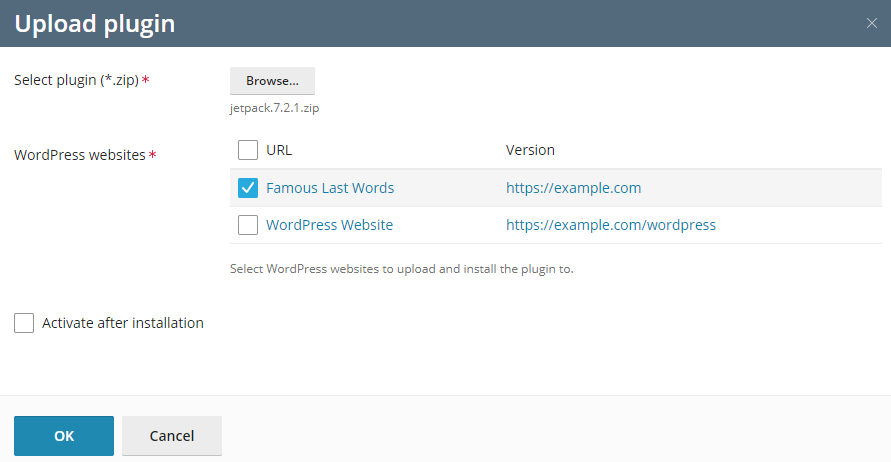
-
Sélectionnez les installations WordPress sur lesquelles vous souhaitez installer le plugin.
-
Par défaut, un plugin nouvellement téléchargé n'est pas activé. Vous pouvez l'activer en cochant la case « Activer après l'installation ».
-
Cliquez sur « OK ».
2. Activer et désactiver des plugins
Vous pouvez activer ou désactiver des plugins sur une ou toutes les installations d'un abonnement.
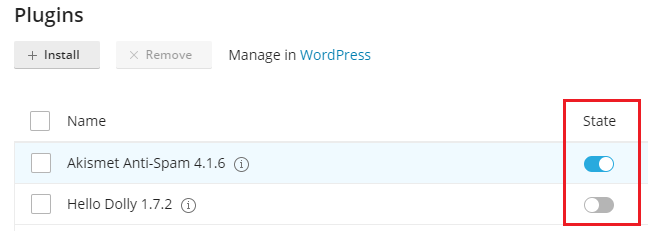
Comment activer ou désactiver des plugins pour une installation spécifique :
-
Allez dans « WordPress » et ouvrez l'onglet « Plugins » sur une carte d'installation.
-
Sous « Statut », vous pouvez activer ou désactiver des plugins.
2.1 Comment activer ou désactiver des plugins pour toutes les installations d'un abonnement :
- Sélectionnez l'abonnement souhaité.
- Allez dans « WordPress » > onglet « Plugins ».
- Sélectionnez le plugin que vous souhaitez activer ou désactiver.
- Cliquez sur « Activer » ou « Désactiver ».
3. Mise à jour des plugins
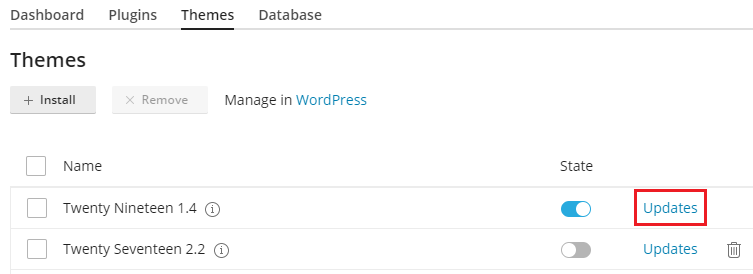
Si un plugin doit être mis à jour, vous verrez sur la carte d'installation, dans l'onglet « Plugins », l'option « Mises à jour » à côté du plugin. Des mises à jour sont disponibles non seulement pour les plugins gratuits mais aussi pour les plugins payants, lorsqu'ils peuvent être mis à jour comme d'habitude via le tableau de bord administrateur WordPress.
Vous pouvez alors procéder comme suit :
- Mettre à jour des plugins pour une installation spécifique. Pour plus d'informations, voir le guide pour la mise à jour manuelle des installations WordPress.
- Mettre à jour les plugins sur toutes les installations de l'abonnement.
- Configurer les mises à jour automatiques pour les plugins. Pour plus d'informations, voir le guide pour la mise à jour automatique des installations WordPress.
3.1 Comment mettre à jour des plugins sur toutes les installations de l'abonnement :
-
Sélectionnez l'abonnement souhaité.
-
Allez dans « WordPress » > onglet « Plugins ».
-
Cliquez sur « Mettre à jour vers la version… » à côté du plugin que vous souhaitez mettre à jour. Pour plus d'informations sur la mise à jour, cliquez sur « Journal des modifications ». Vous serez ensuite redirigé vers la page du plugin sur wordpress.org.
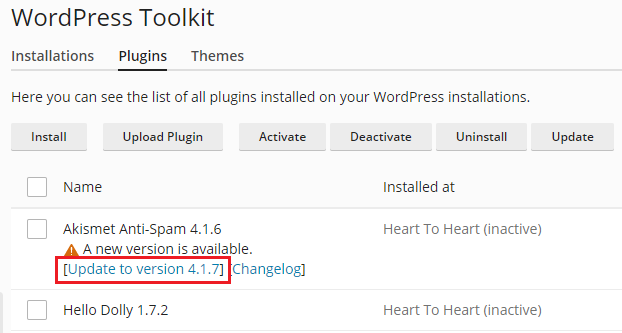
-
Cliquez sur « Oui ».
4. Suppression de plugins
Vous pouvez supprimer des plugins d'une installation spécifique ou de toutes les installations d'un abonnement.
Comment supprimer des plugins d'une installation spécifique :
- Allez dans « WordPress » et ouvrez l'onglet « Plugins » sur une carte d'installation.
- Si vous souhaitez supprimer un plugin, cliquez sur le symbole correspondant «
 ». Si vous souhaitez supprimer plusieurs plugins, sélectionnez-les et cliquez sur « Supprimer ».
 - Cliquez sur « Oui ».
Comment supprimer des plugins de toutes les installations de l'abonnement :
- Sélectionnez l'abonnement souhaité.
- Allez dans « WordPress » > onglet « Plugins ».
- Sélectionnez les plugins que vous souhaitez supprimer, cliquez sur « Désinstaller », puis cliquez sur « Oui ».